“The dice of Zeus always fall luckily.”
Sophocles
After creating the
20 sided die in my post last week, I decided to embrace my inner geek even further and create another die of the standard gamers set.
This time I chose to create a model of the 10 sided die.
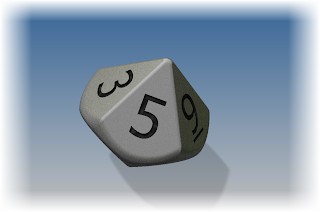 |
| The finished 10 sided die |
To add a little more fun, here's a new trick I'm trying. Embedding a dwf of the die inside the webpage! Try giving it a rotate and pan!
When I started to look at building this die, I found this model easier to create that the 20 sided die. But even though I thought it was a little easier to create, I also found it had it's own set of challenges. It took me a few tries before I got a result I was happy with.
I ended up using two lofts, and trimming the plane where they met to get the result. I then added fillets to clean up the edges and get the result I was looking for.
But, without further adieu, here are the steps!
- The first step was to create a single line on a sketch plane. I'm going to use each end of the line as one end of two lofts I'm going to create. I also made sure that the midpoint of the line was placed at the origin. This will let me use the origin workplanes to create sketches in my next steps.
 |
| The first line defining the top and bottom of the die. |
- Next I created a sketch on my origin plane, added a pentagon, and dimensioned it.
 |
| The additional sketch added. |
- Now I'm ready to loft between the two. I choose the loft tool, and loft between the pentagon and one of the line's endpoints.
 |
| Creating the loft |
 |
| The finished loft |
- Before I started modeling, I looked at an image of a real die, I realized that the upper and lower halves were offset, so I couldn't use the same loft. So I created a second pentagon, rotated from the first, and repeated the steps above.
 |
| Creating the second loft. Notice how it's offset from the first. |
- Now I was left with sharp overhangs on the die that weren't going to work at all. It was time to clean those up!
 |
| The die before cleaning up. Not pretty at all! |
- To clean up the sharp corners, I created a sketch where the two pentagons meet. (Note I used slice graphics, just like in my previous post here). I sketched a circle, then used Extrude with the intersect option remove the sharp corners.
 |
| Creating the feature for the Extrude commad |
 |
| Extruding using the intersect option |
|
- Now the hard work is done. All that is left is the tedious work of adding the numbers.
 |
| Adding the numbers to the die |
- And finally, using the fillet tool to round off the sharp corners!
 |
| All done! |
A quick rendering, in Autodesk Showcase, and I'm ready to go!
Just like with the 20 sided die, below are two links where you can download the model if you'd like. And just like before, all I ask is that you give a me a little nod if you decide to use the model. Enjoy!
Download from Autodesk 360
Download from GrabCAD (login required)


No comments:
Post a Comment